There are two important parts to your Inkjet cartridge refilling business. One is learning how to refill cartridges, but the other is working with your customer. It is important to accept cartridges that are likely to be successfully refilled. Remember: Accept ALL black cartridges. The information below will get you started.
Accepting Cartridges
It is very important to do a good job of accepting or rejecting cartridges. Customer satisfaction depends on it.
View the video:
Does the cartridge pass inspection? Check:
- Does the print head appear to be in good condition?
- Is the cap gone?
- Is the label readable?
- Has the cartridge been mistreated?
Can it be cleaned? Using a RIS special wipe:
- Clean the outer surface
- Clean the connection Pad
- Clean the print head
Go to the touch screen and touch “Select Cartridge”. Follow the screens to find your cartridge and give it an ID tag for processing.
General Refill Steps
There are many different models of cartridges. Â Some of them have refilling steps not stated here. Â This will give you a general list of steps for most cartridges.
To Drill a Cartridge:
- Find and select the correct adapter for the cartridge by using the “Select Cartridge” function on the touch screen.
- Raise both front flaps on the adapter (if IPH cartridge), or raise the crossbar on the T1 adapter for ink tanks.
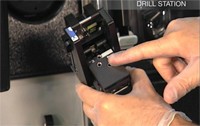
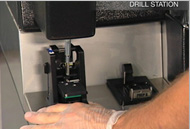
- Place the cartridge in the adapter and lower the drill flap as shown in this image.
- Line up the correct hole with drill. Note: On the T1 adapter move the fill flap out of the way first
- Pull down on the black knob until you feel it “bottom out”. Hold for ~3 seconds.
- Apply firm pressure, allowing the drill to work at its own pace drilling through paper labels or plastic lids.
To Prepare a cartridge for filling:
- Select and highlight the cartridge on the ID Tag on the touch screen prep window.
- Lower Prep flap to create a seal. (prep flap is on the bottom)
- Insert Cartridge into prep station and click into place.
- The process will begin automatically.
- The touchscreen will tell you when this process is complete.
To Test a Cartridge:
Sample Test Strip
To use the Tester, follow these steps:
View Video: Using the Tester
- Remove the cartridge from the fill adapter.
- Find the correct test adapter using the reference on the cartridge ID tag.
- Follow the three C’s – because putting the cartridge into the test adapter is very important.
- Clean the cartridge and adapter
- Click the cartridge into the adapter
- Clear any air bubbles by wiping the print head two or three times
- Choose the cartridge in the test queue.
- Hang the adapter onto the test station and lift up on the latch. (do not force)
- The tester will automatically print a test pattern.
Was the Test Successful?
- Most cartridges will pass the first time.
- Tear of the test pattern and compare it to the test pattern reference card.
- Missing lines indicate broken or clogged nozzles or a possible bad connection to the tester.
- A passing cartridge must have 10 or fewer missing lines per grid.
- If the cartridge does not pass, try a one-time “recover” procedure using the three R’s.
- Retest – Select the retest option from the gear menu. Sometimes just retesting will result in a pass result.
- Recover – If that does not work. put the cartridge back into the Prep/Fill adapter. Select the recover option from the gear menu. Follow the procedure for Prep. A message will flash when recovery is done. Move to retest.
- Retest – Cartridges often pass after resting, as the fresh ink can dissolve the old clogged ink
- Perform a recovery on a particular cartridge only once. After the, the cartridge must be declared a DNP (Did not Pass) and return it to the customer and offer to recycle it.


